Zinc Engine Anodes
By Tom Hale
We are all familiar with the hull anodes (zincs) we replace at every spring commissioning. If you have a freshwater cooled engine with heat exchanger, you probably have internal engine anodes (zincs) as well. For generations, marine engines were built of iron and steel and cooled with water drawn from outside the boat, pumped through the block and manifold, “raw water cooling”. Simple engines, simple systems. Modern inboard engines in addition to iron, steel, may also contain components of bronze, brass, copper, stainless steel and aluminum. With the increasing complexity of engines, fresh water cooling with a heat exchanger has become standard. The raw water passes though heat exchangers while water with antifreeze circulates within the engine and its accessories. The engines last longer with fresh water running through the cooling passages rather than corrosive salt water. Still, the raw water side of modern engine is a witch’s brew of mixed metals which left alone will corrode away. An engine heat exchanger, transmission oil cooler or fuel cooler is built of copper, and brass with brazed joints; these metals need additional protection from galvanic corrosion in the saltwater side of cooling system. We know to add underwater zincs to protect our valuable propellers. Engines today have anodes internal to the raw water-cooling system for the protection of the various metal engine components. Check your owner’s manual to see if you have engine zincs. These things may be out of sight and out of mind, and are frequently neglected and forgotten.
Prepare and disassemble
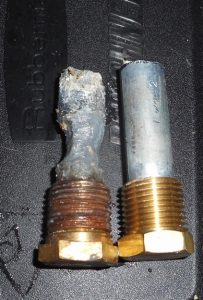
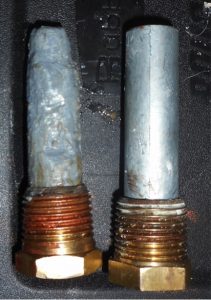
The engine zincs may look like a brass bolt head and will be found in the saltwater side of your heat exchanger (pictures 1, 2). Before you start work, it would be a good idea to close the engine seacock so that you do not have a saltwater waterfall running into your bilge. When you remove the zinc, salt water is going to pour out of the cooling system. Left alone, the salt water and salt crystals will lead to rust and corrosions on the surfaces which it wets. Often the zincs are located above an engine mount or the shaft coupling. These are two places where rust and corrosion will add time and money for future engine work.
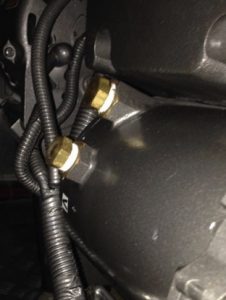
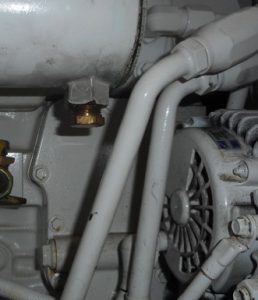
After you find the zincs, prepare the surrounding area. Step one is to spray all the surfaces around and below the zinc with a water disbursing spray such as CRC 6-56. This will allow the water to pass over the exposed metal. If there are ancillary items (alternators, engine wiring harness etc.) which might be damaged by water, cover them with plastic. Now, remove the zinc(s).
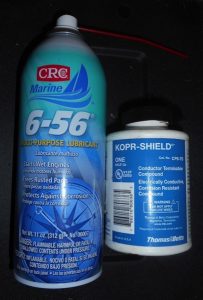
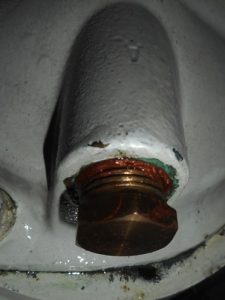
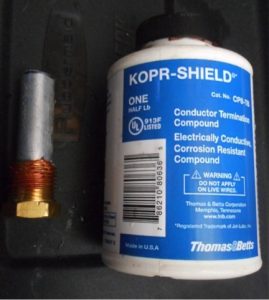
The zinc may be severely corroded (picture# 5), or it may be completely gone! Once you get into the habit of regular service, you might find that the old zinc can be reused (picture #6 ). But seriously, if you have gone to all of this trouble to take out the zinc, just go ahead and put in a new zinc! Note, I remove the old zinc from the brass cap. Clean the internal threads carefully to ensure good electrical contact then I install a new zinc into the reused brass plug cap. I use a tiny dab of Kopr-Shield (pictures 4, 7) here to ensure a good electrical connection.
Install the new zinc
When you install the new zinc, the only water seal is the tapered pipe thread. To make a better seal, some people apply Teflon tape to improve the thread seal. It will: but Teflon tape is an insulator and it might insulate the zinc from electrical connection to the heat exchanger (picture #1). The zinc will last a really long time, because it is not protecting anything. There are better options.
After you have replaced the zincs, test run the engine to check for leaks. (You did reopen the engine seacock right?) This is very important step. A small leak here will drip salt water until you next change the zincs and this can cause significant corrosion in the splash zone.
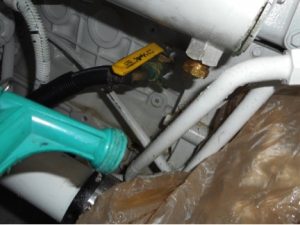
If you find you do have a water leak, apply some grease to the threads to improve the seal. A light application of Kopr-Shield (picture #7) will fix it. This is a highly conductive grease which will act as a water sealant yet maintain excellent electrical contact. When you are comfortable that everything is leak free, the next step is very important but commonly overlooked. Using a spray bottle with fresh water, spray down the entire area around and under the zinc to wash off any remaining salt (picture 8). Then apply a light mist of water dispersing spray such as CRC 6-56 to provide surface protection against rust and corrosion.
Side bar - How often do you change the zincs?
Replacement anodes are not very expensive, but are sometimes hard to reach. Don’t ignore them or let them completely erode.
Most engine manufacturers say change them once a year. The number of hours that you use the engine and the salinity of the water will have an effect on the zinc corrosion rate. We find on the Chesapeake we can run about 200 hours on a set of zincs and change them once a season.
In Florida with saltier water we change zincs about every 100 hours. Remember the anodes only cost a few dollars.
A heat exchanger or oil cooler cost a whole lot more.


